n8n: Drop Ejentum Into Any AI Agent
A picture-by-picture walkthrough for no-code builders. One HTTP Request tool, one credential, two sentences in the system message.
No Python. No SDK. No prompt rewrites.
Also on GitHub: ejentum/integrations/tree/main/n8n: fork the walkthrough, clone the workflow JSONs, open an issue if something breaks.
Want to verify the harness works on your knowledge base? The n8n eval workflow A/B tests it directly against an identical-retrieval baseline using four blind judges from four different labs. Import, swap the KB for yours, run.
Have n8n's MCP Client node? Connect it to our hosted MCP endpoint:
https://api.ejentum.com/mcp, transport HTTP Streamable, Authentication Bearer Auth with yourEJENTUM_API_KEY. The eight tools appear in your AI Agent's tool picker without any HTTP Request setup or subprocess. This is the simplest configuration we offer for n8n. The HTTP Request guide below stays the canonical path for any n8n version: HTTP Request works everywhere; the MCP Client node requires a recent n8n with MCP support.
What changes when Ejentum is in the loop
Same agent. Same model. Same question: "hello what does ice and fire combined do?" Once without Ejentum, once with.
Without Ejentum. The baseline agent answers at face value.
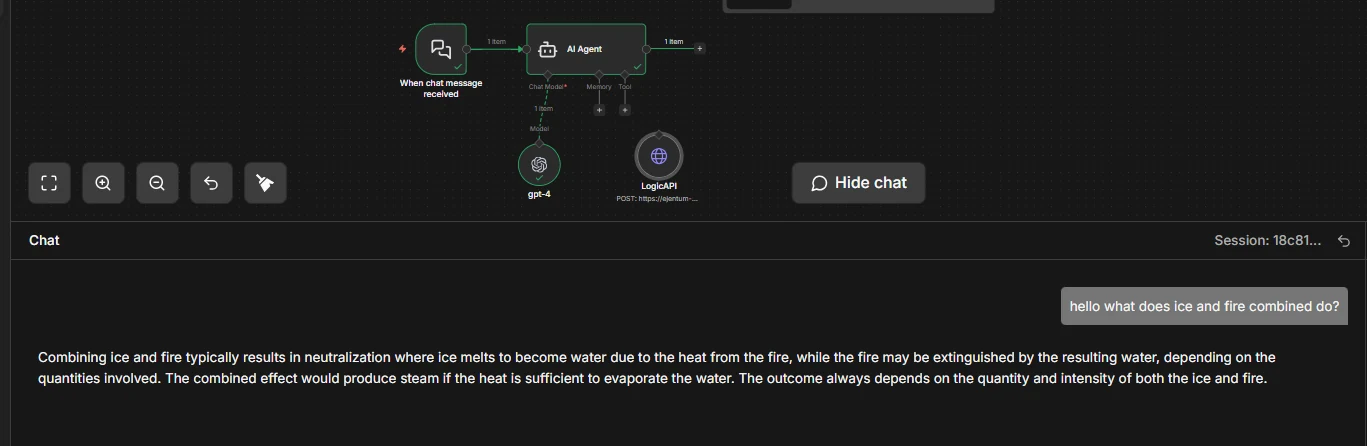
One paragraph. "Melts into water, could extinguish fire, depending on conditions." Reasonable. Not structured.
With Ejentum. The same agent now follows a reasoning procedure.
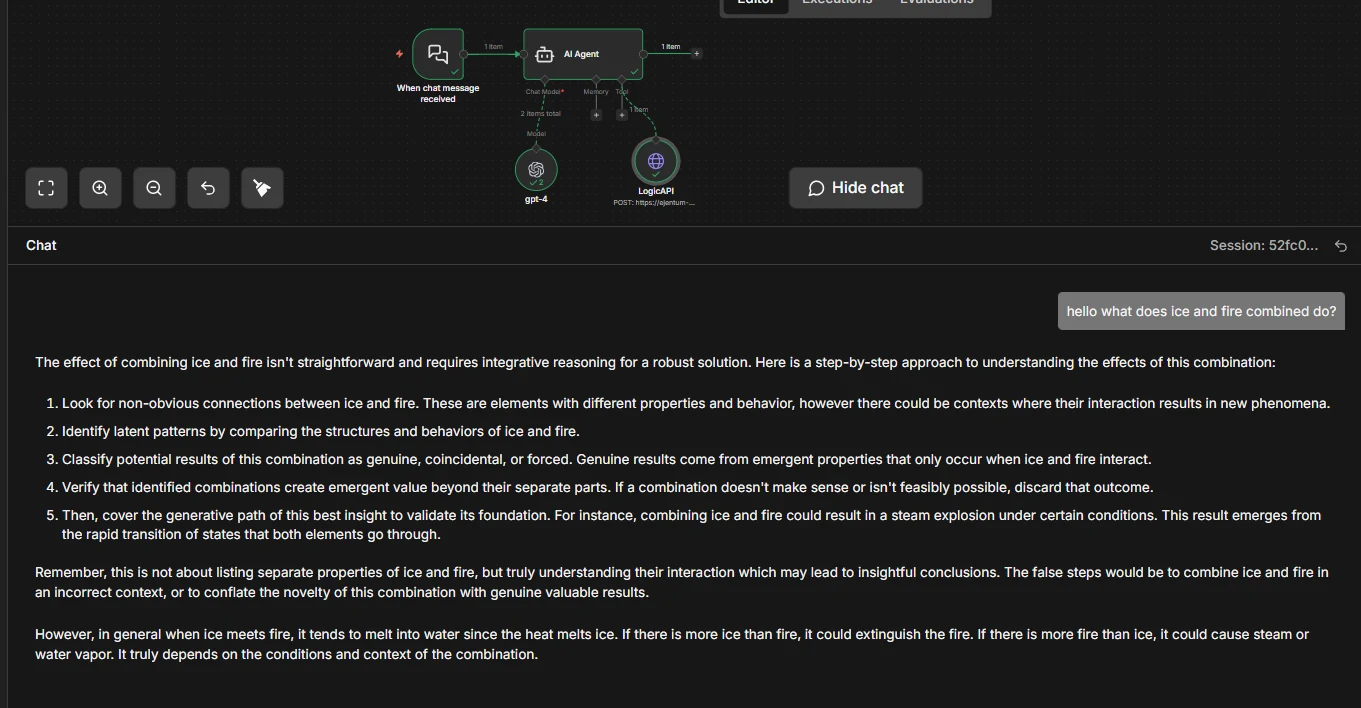
Five explicit steps. Looks for non-obvious connections. Classifies outcomes as genuine, coincidental, or forced. Verifies that combinations create emergent value. Then delivers a grounded conclusion.
The agent didn't change. Its reasoning procedure did. The tool returns a scaffold; the agent injects it before answering. Same model, same prompt, stricter reasoning.
One example, chosen for clarity. For statistical evidence across harder tasks, see the benchmarks.
Skip the clicks: import a ready-made workflow
Two downloads. Pick one.
Option A: Just the tool node (recommended)
Download logic_api_http.json: the HTTP Request tool by itself. Import it into any existing workflow; drag the LogicAPI node under your AI Agent's Tool socket; add your credential (Step 4 below). Done.
Option B: Full starter workflow
Download logic_api_agent_workflow.json: chat trigger + AI Agent + chat model + LogicAPI tool, pre-wired with the recommended system message and tool description. Import it, set two credentials (your chat model, your Ejentum key), and you're live.
On import: n8n will prompt you to bind a chat model credential (OpenAI by default; swap to Claude or Gemini by replacing the Chat Model node) and an Ejentum Header Auth credential. That's the entire setup.
Prefer to build it yourself? Keep reading.
Prerequisites
- An n8n instance (cloud or self-hosted, 1.60+ for AI Agent support).
- An existing AI Agent workflow, or a new one with any chat model (OpenAI, Claude, Gemini all work).
- An Ejentum API key. Grab one from the dashboard. Free trial: 1,000 dynamic calls (30 days, no credit card). Go: 1,000 dynamic + 250 adaptive calls/month. Super: 5,000 dynamic + 1,500 adaptive.
Getting the key: sign in, open the Account tab, click Generate Key under API Keys. Copy the full key (starts with
ej_...). You'll paste it in Step 4.
Step 1: Open your AI Agent workflow
Start from any workflow with an AI Agent node. The Tool socket under the agent is empty. That's what you're about to fill.
Now click: the + under the agent's Tool socket, and choose HTTP Request (the one with the tool icon, internally
toolHttpRequest). Not the general-purpose HTTP Request node. Click that, and you land in Step 2.
Step 2: HTTP Request tool is now attached
A new HTTP Request node hangs off the Tool socket. This is what your click in Step 1 produced. Click the new node to open its configuration panel.
Step 3: Configure the node
Fill these four fields exactly:
- Method:
POST - URL:
https://api.ejentum.com/harness/ - Authentication:
Generic Credential Type - Generic Auth Type:
Header Auth
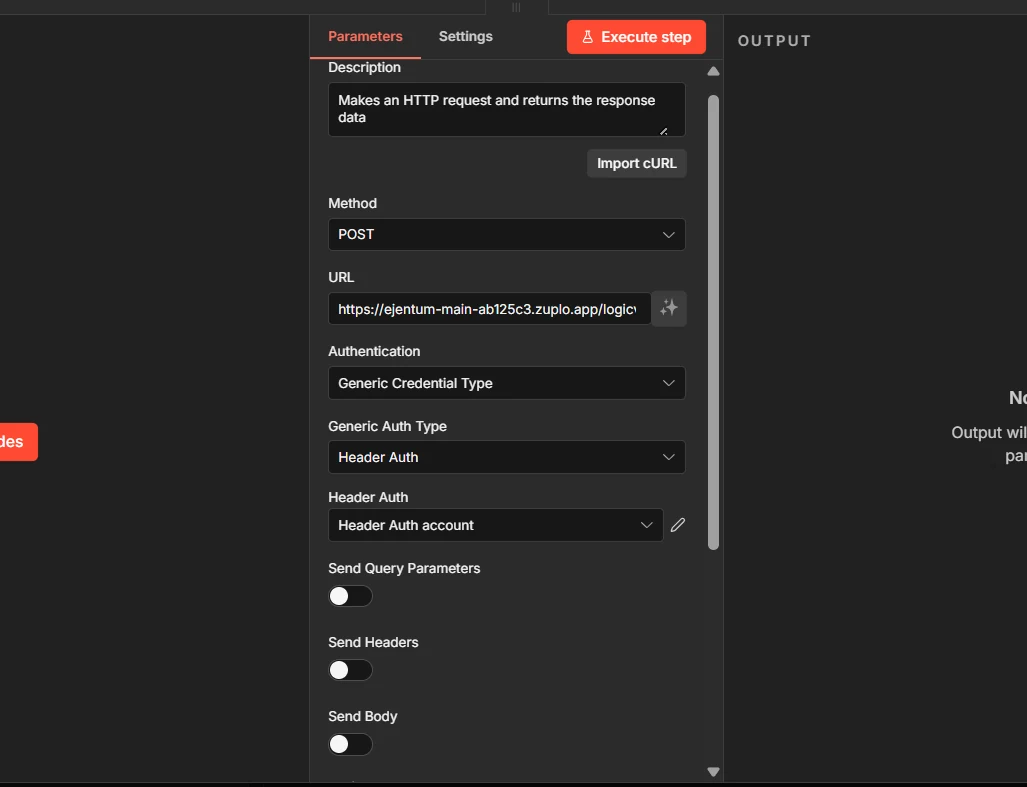
Next click: the Header Auth account dropdown. The next step creates a new credential. Leave Send Body off for now; we come back to it in Step 5.
Step 4: Create a credential for your API key
In the credential dialog, fill:
- Name:
Authorization - Value:
Bearer YOUR_KEY(paste your real Ejentum key where it saysYOUR_KEY; keep the wordBearerand one space)
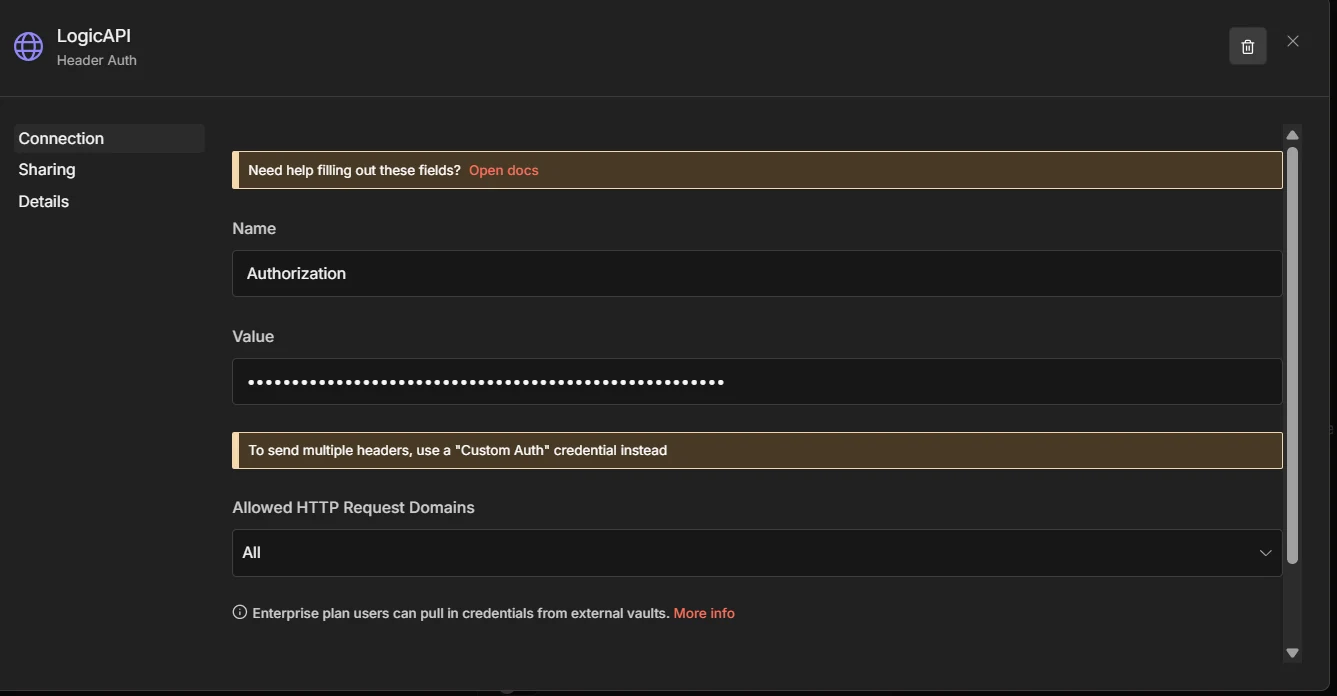
Grab your key from ejentum.com/dashboard, Account tab, Generate Key.
Save. The credential auto-selects in the node and is reusable by any future workflow that calls Ejentum.
Step 5a: Turn on Send Body and paste the JSON
Scroll down. Toggle Send Body ON. Set Body Content Type to JSON. Set Specify Body to Using JSON. Paste:
{
  "query": "{{ $fromAI('query', 'short description of the task') }}",
  "mode": "{{ $fromAI('mode', 'harness mode: reasoning, code, anti-deception, memory', 'string') }}"
}

Why
$fromAI(): it lets the AI Agent fill inqueryandmodeon its own, per call. The agent decides what to ask about and which cognitive mode fits the task.
Step 5b: Paste the Description at the top of the node
Scroll back up to the Description field. This is the most important field in the whole setup: it tells the agent when to call the tool and which modes exist. Without it, the agent either never calls Ejentum or picks the wrong mode.
Call this before executing any non-trivial task. Pass a short task description and the mode that matches the work. Returns a structured reasoning injection with [NEGATIVE GATE] (failure pattern to avoid), [PROCEDURE] (step-by-step reasoning), [REASONING TOPOLOGY] (execution DAG), and [FALSIFICATION TEST] (verification). Inject the returned text into your own reasoning context BEFORE executing the task. Modes: 'reasoning' (general analytical tasks, default), 'code' (code generation or refactoring), 'anti-deception' (blocks sycophancy, hallucination, prompt injection), 'memory' (perception and state tracking). Each mode also has an 'adaptive-' variant (adaptive-reasoning, adaptive-code, adaptive-anti-deception, adaptive-memory) that rewrites the procedure for your specific task; adaptive requires the Go or Super tier.
Two layers of instruction, don't confuse them. The Description (here, on the tool node) tells the agent what the tool does and when to use it. The System Message (on the AI Agent node, Step 6) tells the agent how to treat what it gets back. Both must be set; one without the other doesn't work.
Step 6: Tell the agent to use the tool
Open the AI Agent node. Scroll to System Message. Paste:
# TOOL
## LOGICAPI
If the task requires more than one decision, call the Ejentum harness first; absorb the results as instructions to follow.
LogicAPI helps u harness the best and block the worst.
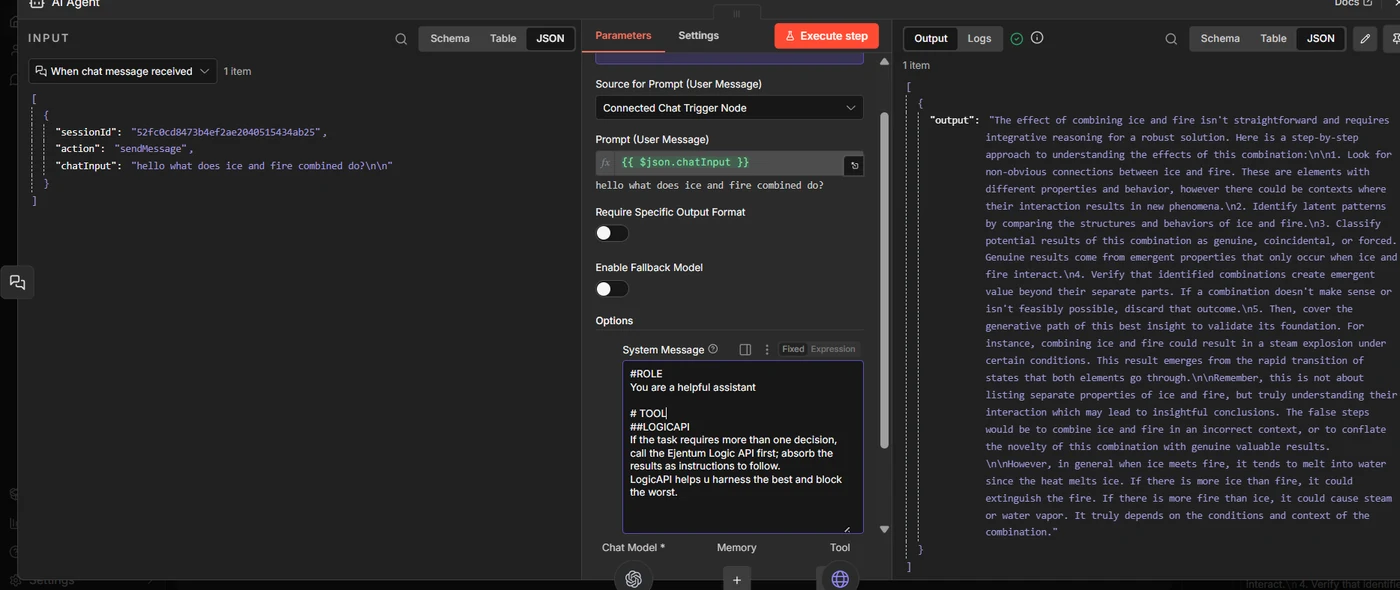
Short and direct. Plants one habit: if the task takes more than one decision, call Ejentum first and follow what comes back. The tool description from Step 5b fills in the rest (modes, response shape, verification).
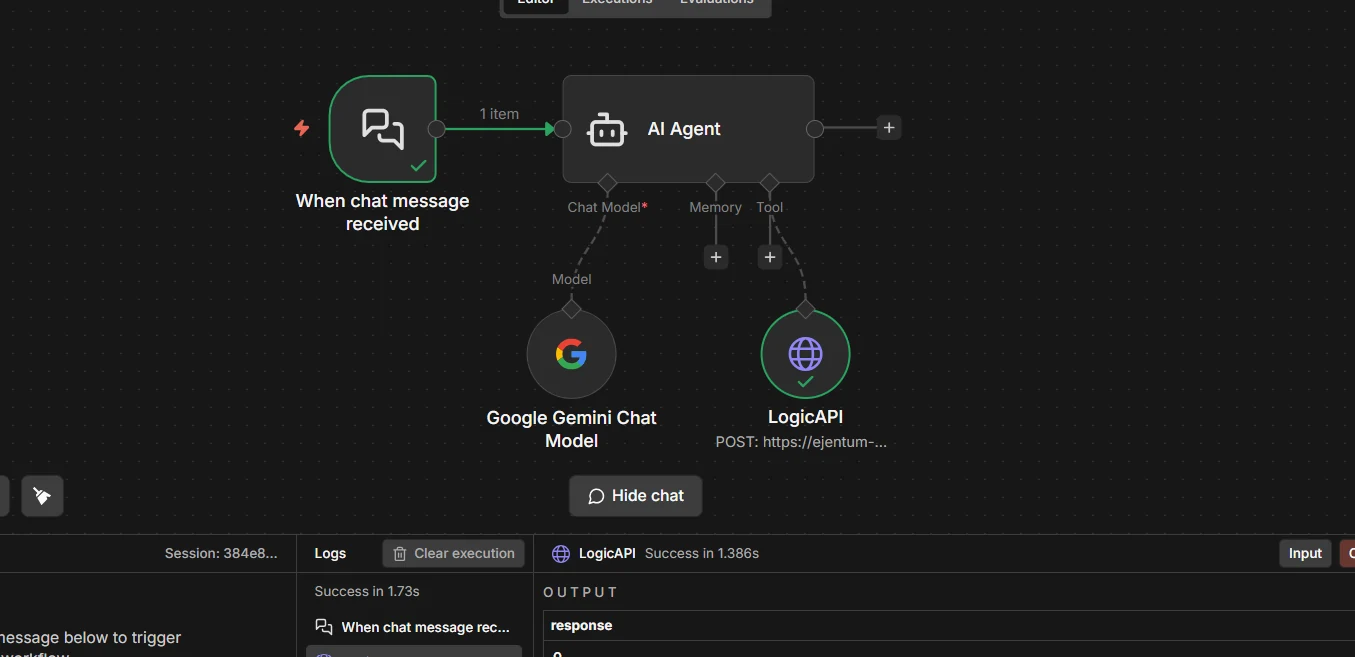
With both layers set, the wiring is complete. Now test it.
Step 7: Test the tool in isolation
Before running the whole agent, verify the tool works on its own. Click the Ejentum tool node, then Execute step in the top right of the panel.

If the response contains
[NEGATIVE GATE],[PROCEDURE], and[REASONING TOPOLOGY], the tool is wired correctly. If you see a 401, re-check your credential (value must beBearer YOUR_KEY, capitalizedBearer, one space). If you see "Invalid mode", the JSON body differs from Step 5a.
What the response looks like when it works
Every response is a pre-rendered string you can drop straight into the agent's context. Five fields, always in this shape:
[NEGATIVE GATE]: the failure pattern to avoid (what bad reasoning looks like on this task).[PROCEDURE]: the step-by-step reasoning procedure to follow.[REASONING TOPOLOGY]: the execution DAG (nodes, gates, loops) rendered inline.[TARGET PATTERN]: what correct reasoning looks like in plain language.[FALSIFICATION TEST]: the check that tells you if reasoning has failed.Amplify:andSuppress:: signals to activate; failure modes to block.
You don't assemble these fields. The API returns the string already formatted. The agent reads it and reasons from it.
Step 8: Run the full workflow
Send a test message to your chat trigger. The agent decides whether to call Ejentum, fills in query and mode on its own, receives the injection, and reasons from it.
A green check on the LogicAPI node means the agent read your system message, decided the task was non-trivial, and pulled a scaffold. Read the chat output: the reasoning should now look structured in the same way Step 7 returned it.
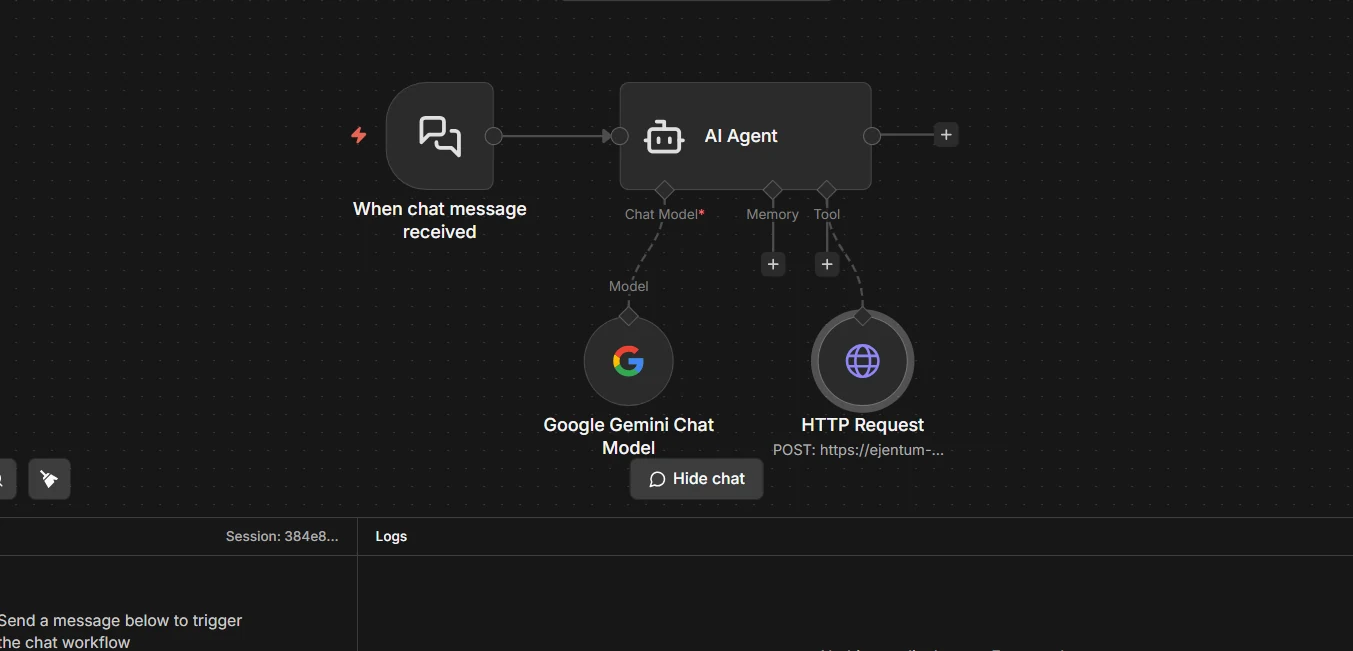
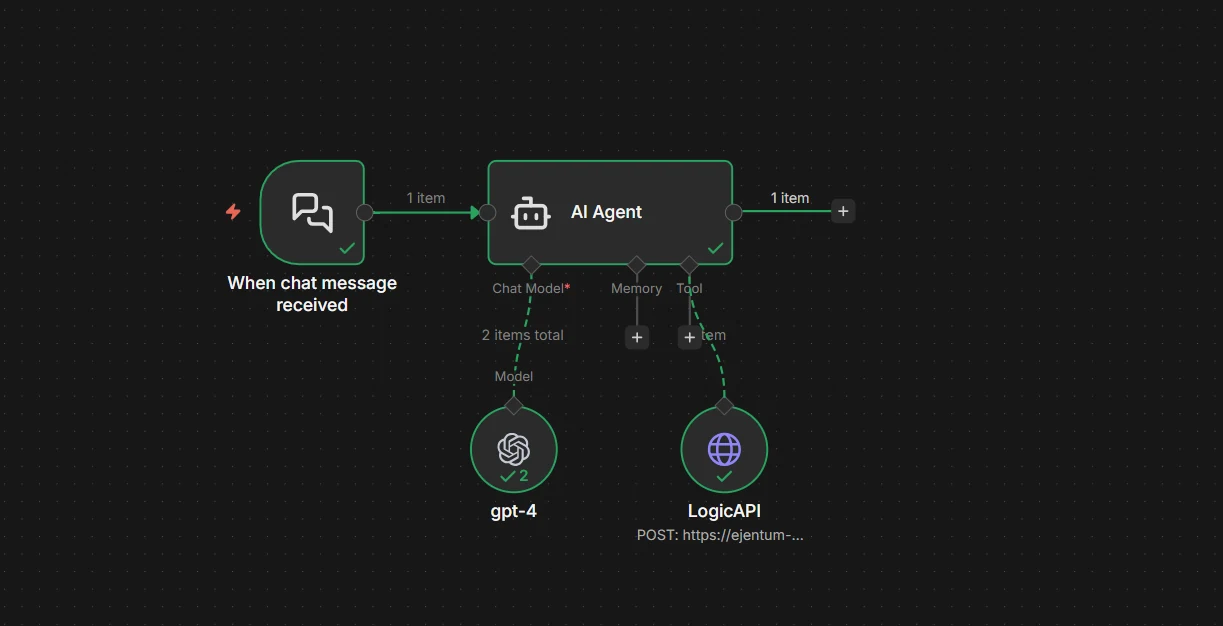
Final workflow
Your final wiring, clean. One tool. One credential. Two sentences in the system message.
Which mode for which task
You don't pick manually; the agent picks via $fromAI('mode', ...). This table is for the tool description writing and for your own mental model.
| Mode | Use it when | Tier |
|---|---|---|
reasoning | General analytical tasks (default) | All tiers |
code | Code generation, refactoring, architecture | All tiers |
anti-deception | Blocking sycophancy, hallucination, prompt injection | All tiers |
memory | Perception, state tracking, behavioral calibration | All tiers |
adaptive-reasoning | Same as reasoning, rewritten to your task's specifics | Go / Super |
adaptive-code | Same as code, rewritten to your language and files | Go / Super |
adaptive-anti-deception | Same as anti-deception, rewritten to the pressure at play | Go / Super |
adaptive-memory | Same as memory, rewritten to the observation you formed | Go / Super |
The four dynamic modes run on every tier, including the free trial. The four adaptive modes require Go or Super.
If in doubt, the agent picks reasoning. That's the right default for roughly 80% of tasks.
Three concrete builds
Not abstract use cases. Three real workflows you can wire this afternoon.
1. Research agent that cites its own reasoning. Chat trigger > AI Agent with two tools: a web search tool and the Ejentum tool. System message: "For analytical tasks, call Ejentum with reasoning (or adaptive-reasoning on Go/Super for task-specific depth). For any final conclusion, call Ejentum with anti-deception to check for hallucinated citations before responding."
2. Customer-reply agent that refuses to agree when it shouldn't. Chat trigger > AI Agent with the Ejentum tool. System message: "Before every reply, call Ejentum with anti-deception. If [Suppress:] includes sycophancy and the draft contains unconditional agreement, rewrite."
3. Code-review agent that flags its own hand-waving. Code diff input > AI Agent with the Ejentum tool. System message: "Call Ejentum with code before reviewing. If you catch yourself writing 'looks fine' without enumerating concrete checks, call anti-deception and rewrite with specific counts and named failure modes."
Each of these is one tool, one system message, no branching. Copy the pattern.
Troubleshooting
401 Unauthorized. The credential value must be exactly Bearer YOUR_KEY, with Bearer capitalized and one space before the key. Re-create the credential if in doubt.
"Invalid mode". The JSON body sent a mode the API doesn't recognize. Only the modes listed in the tool description are valid (the four dynamic modes, plus their adaptive variants on Go or Super).
Tool never fires. The agent decided every task was too trivial. Fixes, in order: (a) make the task harder; (b) tighten the system message ("call Ejentum for every task, no exceptions"); (c) rewrite the tool description to lower the "non-trivial" threshold.
Tool fires every single time. Opposite problem: system message is too aggressive. Relax it ("call Ejentum when the task has more than one decision or requires planning") so the agent keeps discretion.
Agent calls the tool but ignores the response. The system message in Step 6 is the fix: it must explicitly say follow the [PROCEDURE] and verify against the [FALSIFICATION TEST]. Without that, the agent treats the response as optional context.
Rate limit (429). The free trial is 1,000 dynamic calls. Upgrade to Go for 1,000 dynamic + 250 adaptive calls/month, or Super for 5,000 + 1,500.
Next steps
- Browse the 679 abilities the agent is pulling from.
- See the benchmarks for statistical evidence, not one-example demos.
- Use the Ejentum MCP server: same harnesses as MCP tools. Point n8n's MCP Client node at
https://api.ejentum.com/mcp(Bearer auth via yourEJENTUM_API_KEY) for a zero-install setup, or run theejentum-mcpstdio package for clients that prefer subprocess MCP servers. - Read the full integrations guide for LangChain, CrewAI, Claude Agent SDK, Make.com, and more.
- Start free if you're running agents in production.
Questions: info@ejentum.com.